小码奔腾

记录一些和自动化测试、CI有关的想法


  • Home

  • Archives

Python的单元测试unittest中的Mock使用小结

Posted on 2018-04-14

Part One

前面一篇博文简单说了使用unittest.mock对无返回值的函数做单元测试,这里是更多一些例子的总结。

被测函数中使用到了input需要自动化输入

1
2
3
4
5
6
7
8
9
10
11
12
13
14
15
16
17
18
19
#!/usr/bin/env python3

from unittest import TestCase
from unittest.mock import patch
from unittest import main

def func_input():
name = input("Enter your name: ")
print('Your name is {}'.format(name))

def test_func_input():
with patch('builtins.input') as mocked_input:
mocked_input.side_effect = ('Jo',) #当input的时候会输入Jo
with patch('builtins.print') as mocked_print:
func_input()
mocked_print.assert_called_with('Your name is Jo')

if __name__ == '__main__':
main()

需要验证函数是否被“被测函数“调用

1
2
3
4
5
6
7
8
9
10
11
12
13
14
15
16
17
18
19
20
#!/usr/bin/env python3

from unittest import TestCase
from unittest.mock import patch
from unittest import main


def func_1():
func_2()

def func_2():
print("It's func 2!")

def test_func_1():
with patch('func_2') as mocked_func_2:
func_1()
mocked_func_2.assert_called_once() #断言mocked_func_2被调用过一次,在执行func_1()后

if __name__ == '__main__':
main()

mock.patch()和mock.patch.object()的区别

这一块我还不是特别明白,搜索了下,大致区别如下

mock.patch() doesn’t require that you import the object before patching, while mock.patch.object() does require that you import before patching

有一个遗留问题,如下代码中,完全不能使用mock.patch()吗?

1
2
3
4
5
6
7
8
9
10
11
12
13
14
15
16
17
18
19
20
21
22
23
24
25
26
27
28
29
30
31
32
33
34
35
36
37
38
39
40
# py_unittest.py

from unittest import TestCase
from unittest.mock import patch
from unittest import main


class Person(object):
def __init__(self, name):
self.name = name

def print_name(self):
print('My name is ' + self.name)

def print_parents(self):
mother = input("Enter mother's name: ")
father = input("Enter father's name: ")

print("{}'s parents are {} and {}.".format(self.name, mother, father))
self.fake_func()

def fake_func(self):
pass

class FuncTest(TestCase):
def test_print_parents(self):
john = Person('John')

with patch('builtins.input') as mocked_input:
mocked_input.side_effect = ('Jo', 'Lee')
with patch('builtins.print') as mocked_print:
with patch.object(Person, "fake_func") as mocked_fake_func:
# with patch('Person.fake_func') as mocked_fake_func: 启用这里的话,会报
# 错 ModuleNotFoundError: No module named 'Person'
john.print_parents()
mocked_print.assert_called_with("John's parents are Jo and Lee.")
mocked_fake_func.assert_called_once()

if __name__ == '__main__':
main()

Part Two

今天研究了下,问题解决了,关键还是一个查找module的问题。

小结一个import的基础用法

很多源代码里看到这样的用法,from flask import Flask,from models.item import ItemModel,然后当我自己创建了一个名字叫person的module的时候,如果我也想在其他代码里方便的使用from person import Person来导入Person类的话,可以这样做。

创建person目录,同时目录下有__init__.py和person.py两个文件,

person.py中定义了一个Person类,有__init__.py文件存在,则会定义这个目录是一个module,同时文件内容如下:

1
2
3
__all__ = ['Person',]

from .person import Person

这样在其他module或者python代码里,就可以通过from person import Person来导入Person类了,假如__init__.py是空的,则需要使用from person.person import Person来导入Person类。

回到最开始mock.patch()的问题,解决代码可见于segmentfault上问题关于mock.patch()和mock.patch.object()的区别的问题的回答。
使用unittest做print这样无return返回值函数的单元测试

Posted on 2018-04-11

在看Python里自带的一个单元测试库unittest,有个有意思的应用是可以对类似于print()这样无return返回值的函数做验证。见下面代码。

1
2
3
4
5
6
7
8
9
10
11
12
13
14
15
16
17
18
19
20
21
22
23
24
25
26
27
28
29
30
#!/usr/bin/env python3

from unittest import TestCase
from unittest.mock import patch
from unittest import main

class Person(object):
def __init__(self, name):
self.name = name

def print_name(self):
print('My name is ' + self.name)

class FuncTest(TestCase):
def test_print_name01(self):
john = Person('John')

with patch('builtins.print') as mocked_print:
john.print_name()
mocked_print.assert_called_with('My name is John')

def test_print_name02(self):
john = Person('Donald')

with patch('builtins.print') as mocked_print:
john.print_name()
mocked_print.assert_called_with('My name is Donald')

if __name__ == '__main__':
main()

执行结果

1
2
3
4
5
6
reedx:garrulous_py_practice reed$ python3 py_unittest_01.py
..
------------------------------------
Ran 2 tests in 0.001s

OK

其中的with patch('builtins.print') as mocked_print: 语句是在with的block里,将内置函数print替换为mocked_print函数,再去block里执行print,实际也就是在执行mocked_print函数,然后去检查mocked_print函数是否收到同样的传入参数,也即检查了print语句的输出(print语句自然是传入什么样的字符串,就输出打印出什么样的字符串)。

显而易见,这就是去验证目标函数或者方法的传入参数,单元测试里可以应用的范围很广。

CI/CD在Jenkins上的简易实现

Posted on 2018-04-05

Build job

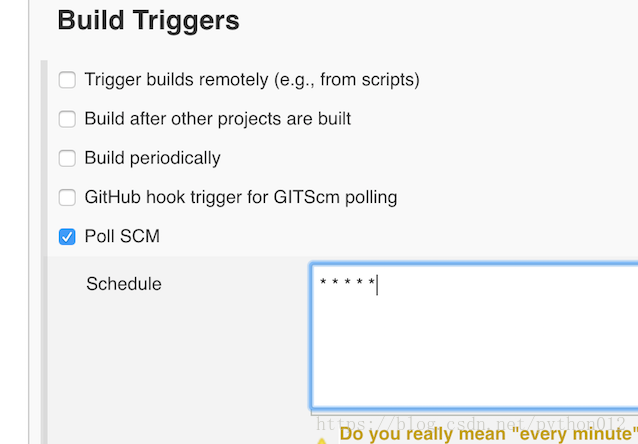
在pipeline的最上游的Build job里的Configure里做如下设置,可使该job以1分钟1次的频率,去轮询Git repository里的代码,如果有更新,则即刻开始build。* * * * *表示轮询频率是每一天的每一分钟,这里是用的Cron表达式,具体可见Cron Format。

Continous Delivery(持续交付),里面当然包含了自动化部署,以Java实现的web app项目为例,部署就需要拿到编译通过并打包好的war包文件,并部署到Tomcat服务器上。

在job Configure -> Build -> Invoke top-level Maven targets里填入 clean package,然后在Post-build Actions里添加Archive the artifacts,填入**/*.war,表示寻找所有war文件并存档到workspace里。

当然Build job里也是可以跑单元测试和做静态代码检查的。

继续在Configure -> Post-build Actions里添加Build other projects,在这里填入下游的staging job的名字。

Staging job

在用来部署staging环境的job里,需要用到Copy Artifact插件,和Deploy to container插件。

Configure->Build里添加Copy artifacts from another project,Artifact to copy里填**/*.war,Post-build Actions里添加Deploy war/ear to a container,Container里选择合适的容器,比如Tomcat 8.x,设置好Credentials和Tomcat URL,保存。顺利的话,至此,启动上游Build job成功后,会拉起这个staging job,会把war包部署到Tomcat里,这时候打开Tomcat下的web app的链接,就能看到运行的web app了,这也意味着可以开始下一步的产品测试,比如接口测试和Selenium实现的Web UI测试。

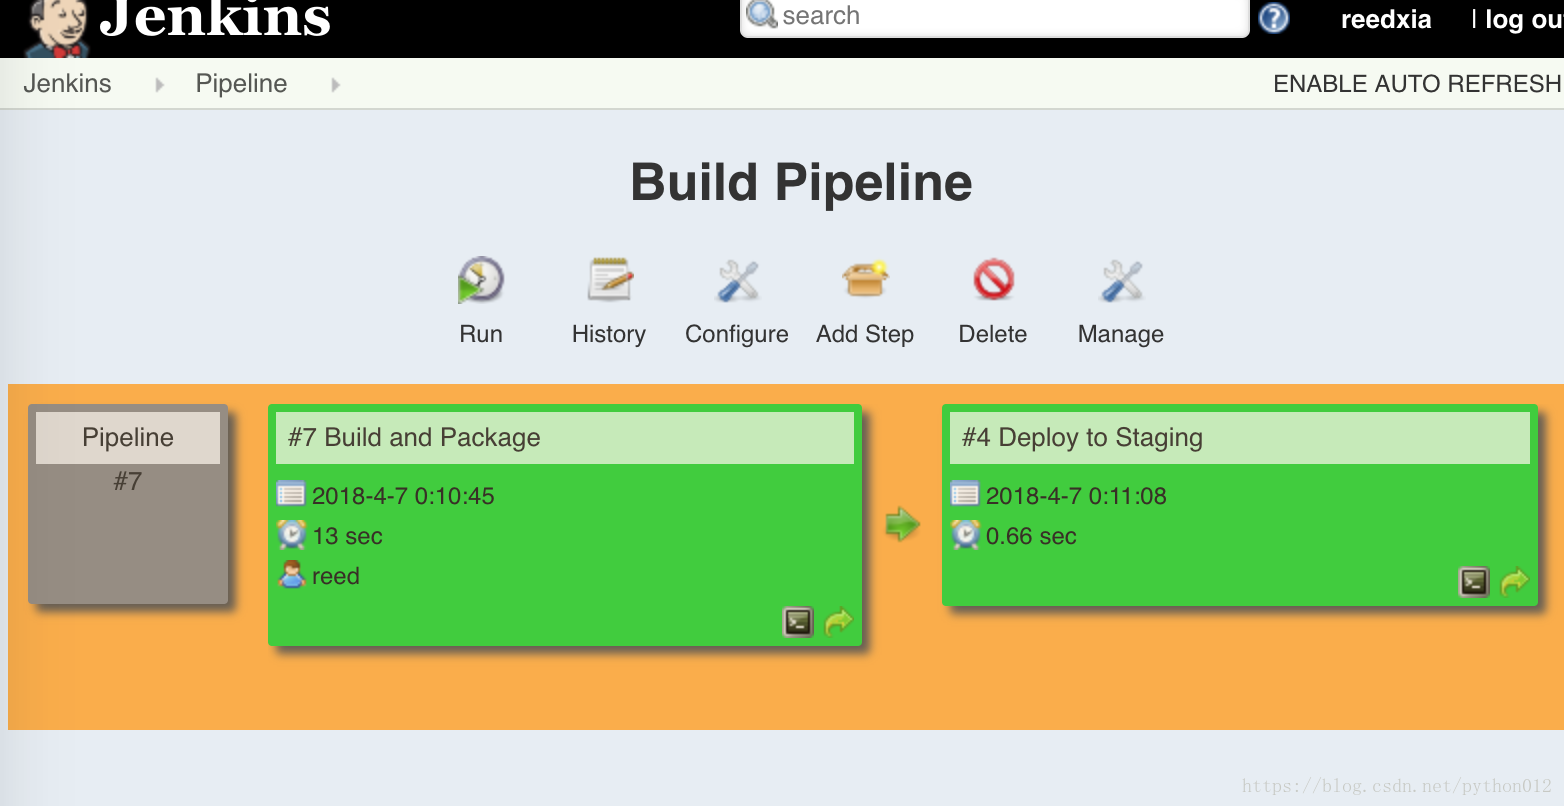
最后使用Build Pipeline Plugin插件,新建pipeline view,可获得下面的可视化的pipeline效果。

在Maven+Jenkins项目里添加Java静态代码质量检查并发布报告

Posted on 2018-04-05

需要的插件:

  • Maven Integration plugin
  • Checkstyle Plug-in

具体步骤:

  1. 新建job,选择Freestyle project。 Source Code Management选择Git,填入Repository URL。
  2. Build中添加Invoke top-level Maven targets,Maven Version里选择之前在Manage Jenkins->Gloabl Tool Configuration里设置的Maven name.
  3. Goals里填入Maven命令,比如clean package,这里为了添加Java静态代码检查功能,实际设置为clean package checkstyle:checkstyle。
  4. Post build actions里添加Publish Checkstyle analysis results,再Save。
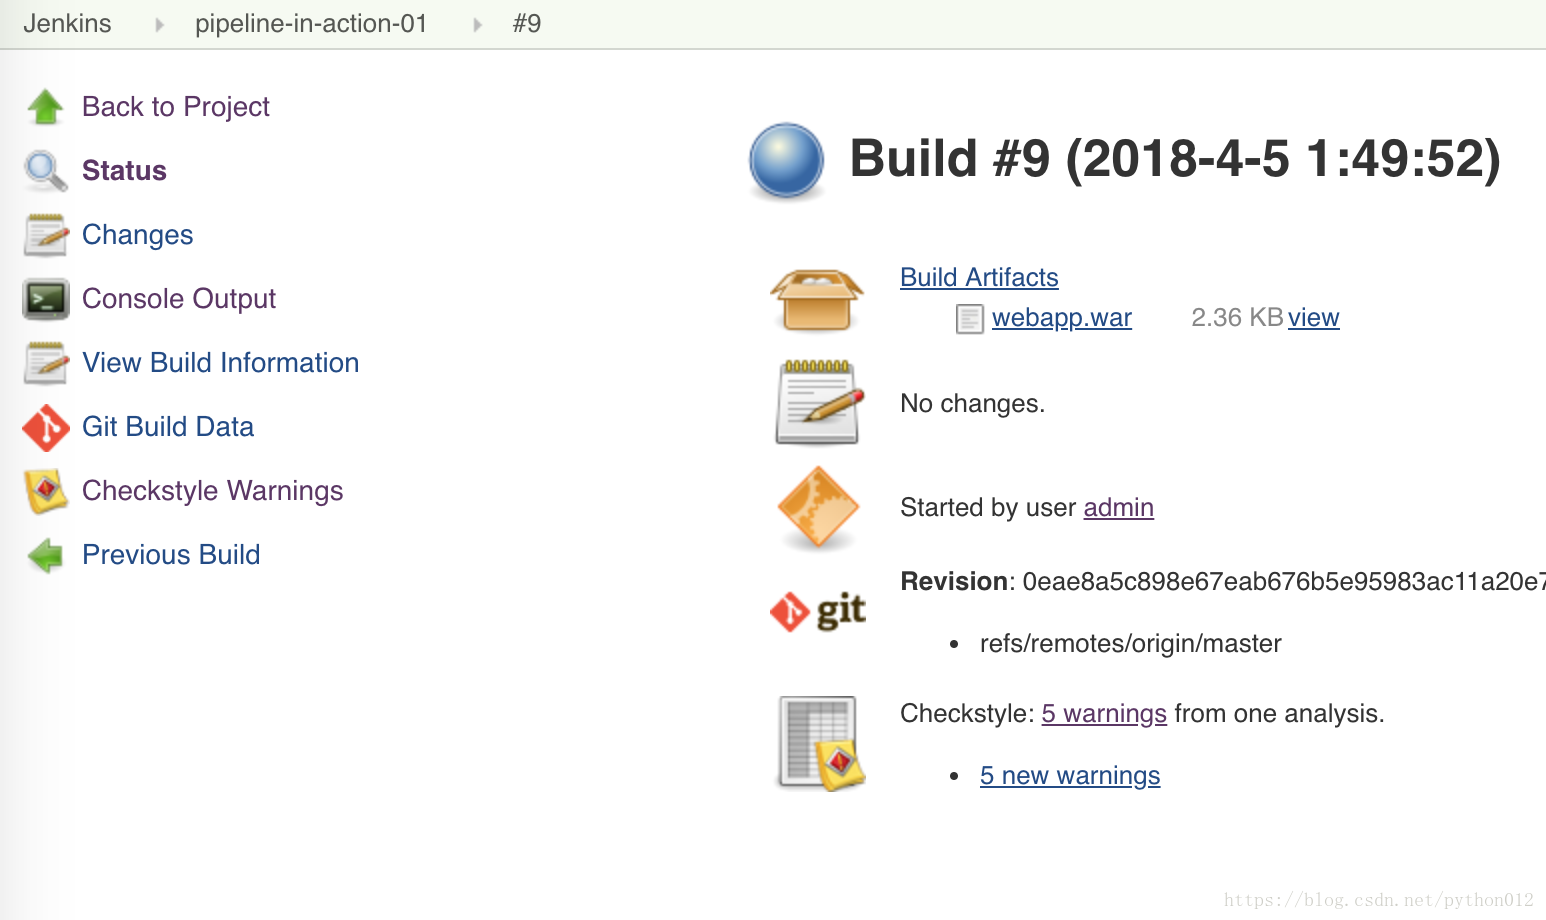
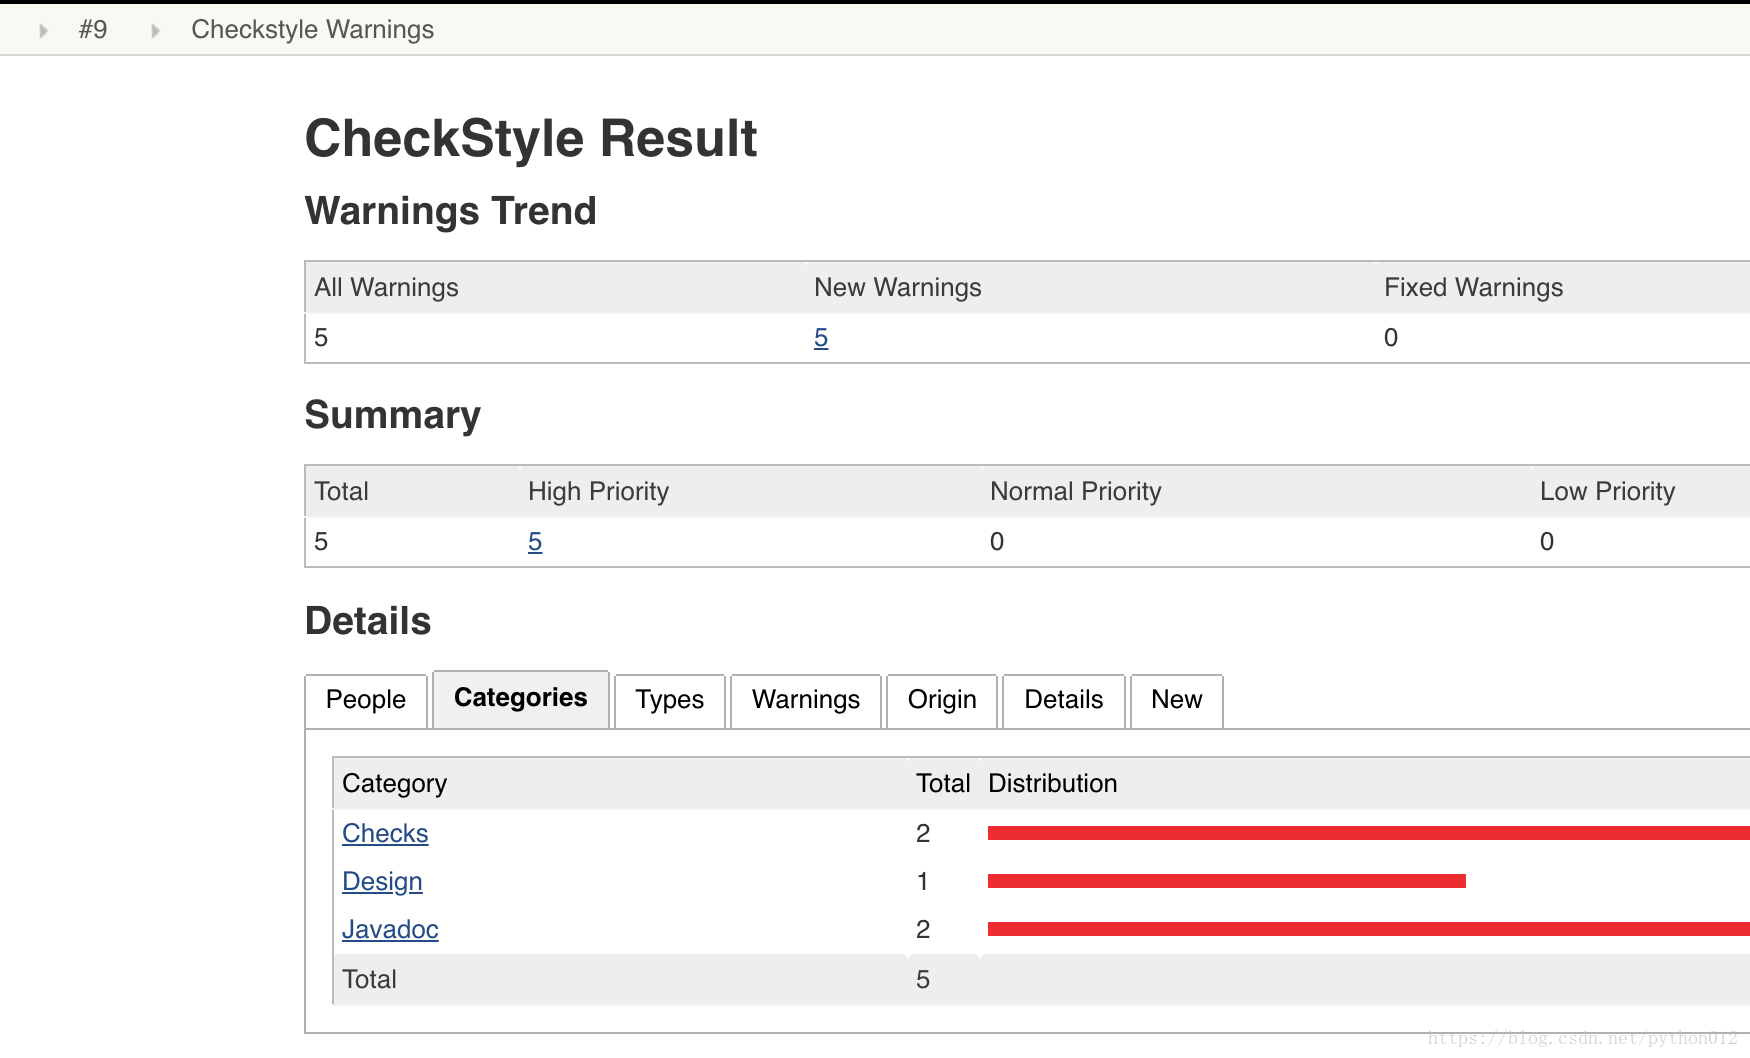
  5. 下次build即可见到代码质量报告,和非常具体的错误提示。

效果如图


可选的其他静态代码检查工具插件:

  • PMD Jenkins plugin
  • Findbugs Jenkins Plugin

'Master Jenkins CI For DevOps and Developers'课程总结

Posted on 2018-04-04

这个课程的内容不算多,不到一个星期就看完了,赶紧来做个总结和笔记。

课程中的内容大致分为3部分。

  • 普通的Jenkins pipeline的创建。从github(git)上pull代码,触发的时间设置(Poll SCM),配置JDK、Maven、Git,配置Maven项目,Maven项目中clean package后收集生成的war包,job之间的触发的互相依赖,使用pipeline插件,让pipeline更加的可视化。
  • Jenkins pipeline as code的实现,就是把pipeline的建立、各项具体配置都写在jenkinsfile里。在创建job的时候,选择pipeline而不是freestyle。
  • Jenkins master和slave结构的建立。

Jenkins master和slave结构的建立

重点记一下这部分。

课程中的目标是,使用两台ubuntu主机,一台作为master,一台作为slave。为了方便起见,这里是申请了https://www.digitalocean.com/ 里的两台ubuntu 16.04LTS主机。

先登陆master主机上安装Jenkins,具体命令

  1. wget -q -O - http://pkg.jenkins-ci.org/debian/jenkins-ci.org.key | apt-key add -
  2. echo deb http://pkg.jenkins-ci.org/debian binary/ > /etc/apt/sources.list.d/jenkins.list
  3. apt-get update
  4. apt-get install jenkins

参考链接https://jenkins.io/doc/book/installing/#debian-ubuntu,注意默认会去安装Jenkins的最新版,安装指定版本可用apt-get install jenkins=2.67。

实际验证中发现Ubuntu主机上没有安装JDK,所以还要先安装jdk8。命令如下

  1. sudo add-apt-repository ppa:webupd8team/java
  2. sudo apt update
  3. sudo apt install oracle-java8-installer

参考链接是http://tipsonubuntu.com/2016/07/31/install-oracle-java-8-9-ubuntu-16-04-linux-mint-18/

还可以继续安装jre,命令是sudo apt install oracle-java8-set-default。

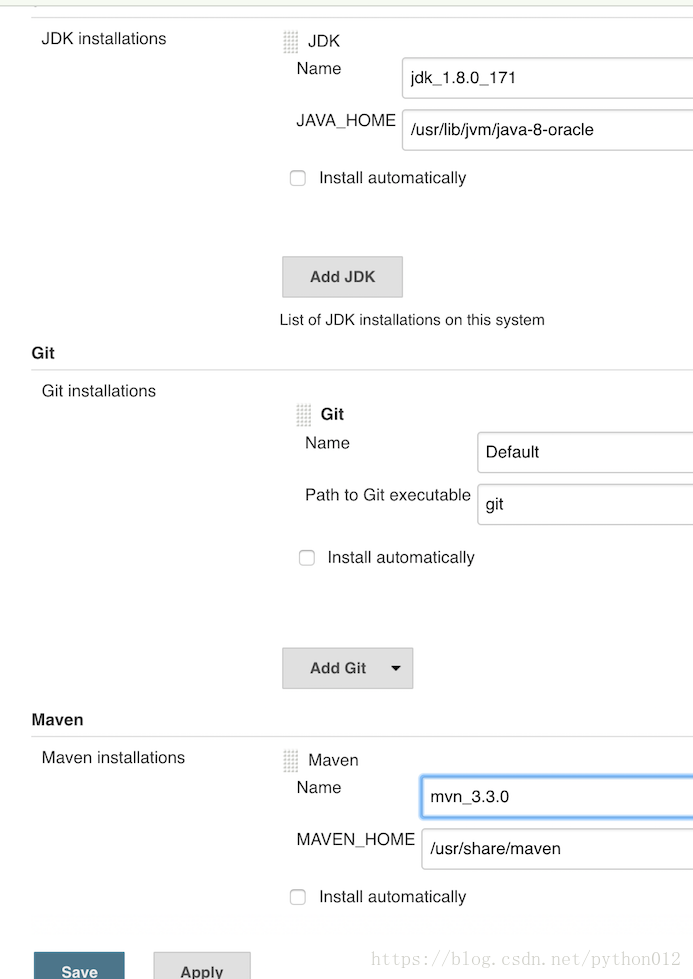
另外在master的Ubuntu上安装Maven后,还需要去Global Tool Configuration里去配置JDK,Git和Maven的路径,下面是我配置的默认路径:

然后需要master主机上生成一对rsa密钥,再在master和slave上执行以下命令,达到可以无密码访问slave主机效果

sudo -iu jenkins
ssh root@slave_ip mkdir -p .ssh
cat .ssh/id_rsa.pub | ssh root@slave_ip ‘cat >> .ssh/authorized_keys’

在slave主机上执行

mkdir ~/bin
cd bin
wget http://master_ip:8080/jnlpJars/slave.jar

打开运行master主机上的Jenkins主页,登陆后新建一个node,Remote root directory可填/var/jenkins,Launch command填ssh root@slave_ip java -jar /root/bin/slave.jar,保存后刷新页面,slave node应该就连接上了。后面就应该就简单了,可以继续配置slave node的lable,然后配置job在具体某个lable上执行。

第一部分普通jenkins pipeline的建立,还需要再复习一下。

完成课程后可以拿个证书。

Enrolled 'Master Jenkins CI For DevOps and Developers'!

Posted on 2018-04-01

在Thoughtworks第一次接触pipeline等概念后,非常认同由Jenkins pipeline串联起来的开发-测试-部署这个工作模式,试听了下这个课程,instructor是James Lee,可能是位华裔,口音好听多了,而且课程设计可称的上是精致,确实是认真备课过的。目前已经完成了好几章了,很是喜欢。目前的问题的是学的太快,急需总结。

1…3456
Reed Xia

Reed Xia

记录一些和自动化测试、CI有关的想法

33 posts
32 tags
GitHub E-Mail
© 2018 Reed Xia
Hosted by GitHub Pages